How to Build a DIY Golf Simulator for Under £1,000
A full golf simulator for under £1,000? It's possible. Step-by-step build guide with budget breakdown, launch monitor picks, and software options.
This article contains affiliate links. I earn a small commission from purchases through these links. It helps keep Green Streak free and costs you nothing extra.
Prices are typical UK prices as of September 2026 and change often.
Quick Summary
- Under £1,000 total: a working DIY golf simulator is possible with a radar launch monitor, hitting net, good mat and your existing phone or tablet
- Space requirements: plan for at least a 9-foot (2.7 m) ceiling, 14 feet (4.3 m) of depth and 10 feet (3 m) of width
- The launch monitor is the biggest expense: expect it to take around half your budget or more, because it decides how accurate every session is
- Log your sessions in the free Green Streak app, which tracks your practice streak so the simulator gets used rather than gathering dust
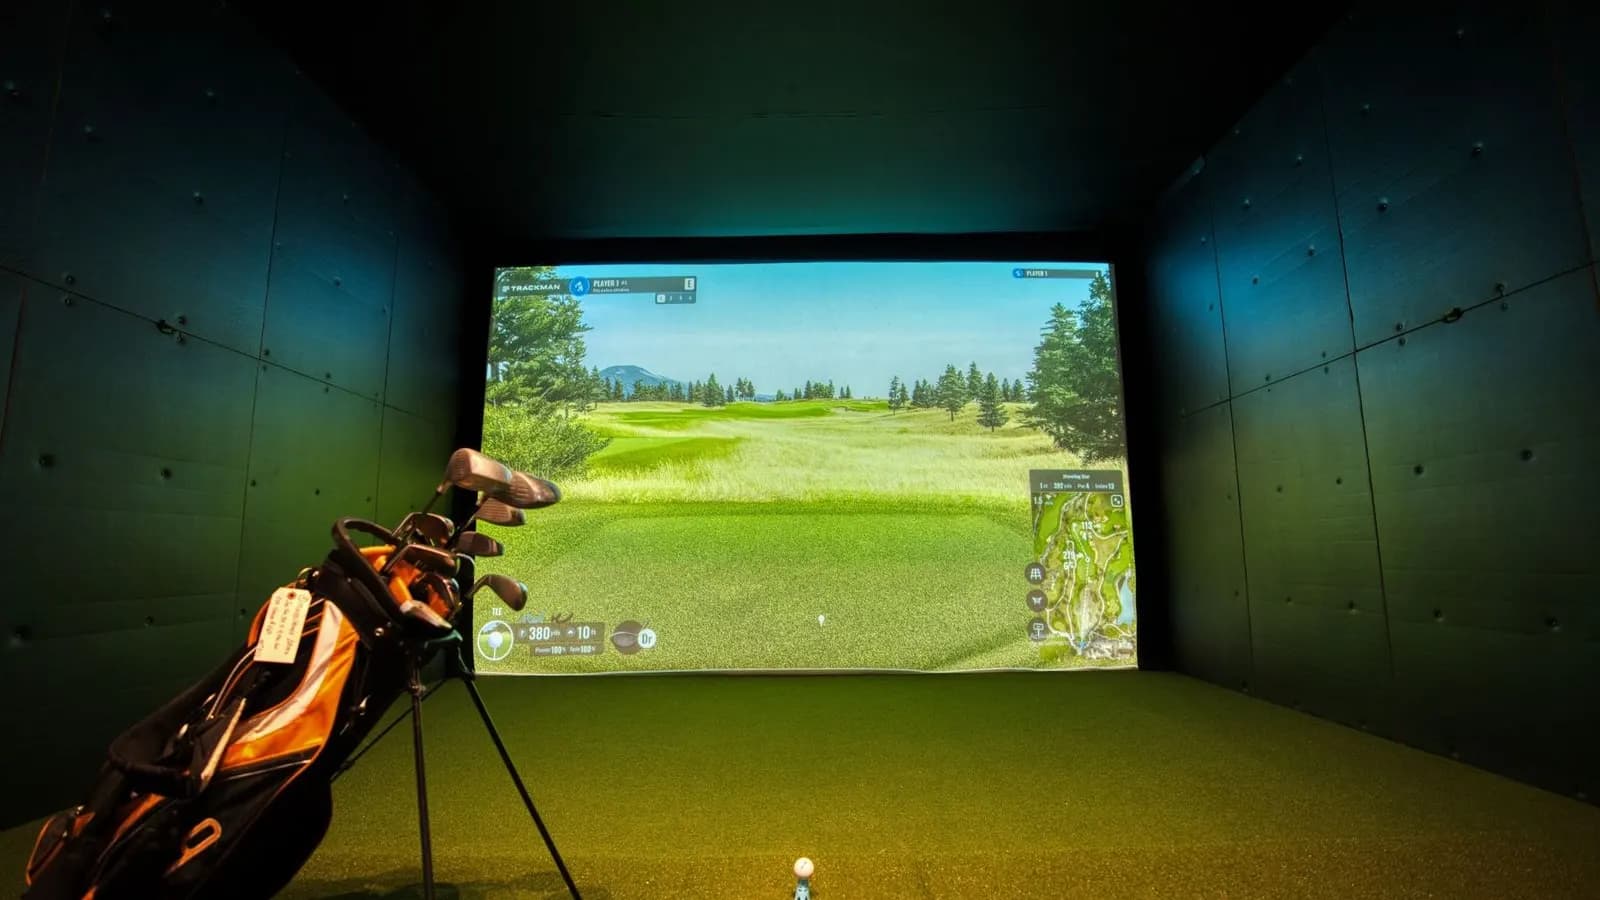
The phrase "golf simulator" usually brings to mind £20,000 Trackman bays in country clubs. But radar launch monitors have come down a long way in price over the last few years. Accurate indoor practice is now a garage project rather than a luxury renovation.
Quick Answer: You can build a working DIY golf simulator for under £1,000. Pair a radar launch monitor like the Garmin Approach R10 (~£450) with a durable hitting net (~£150-£360) and a used commercial mat (~£100-£150). Use your existing phone or tablet as the display, and skip the projector and impact screen for now. This setup tracks ball speed, spin, carry distance and shot shape, which is plenty for useful daily practice.
Table of Contents
- Can I Build a Golf Simulator on a Budget?
- What Do I Need for a DIY Golf Simulator?
- Space Requirements
- Step-by-Step Build Guide
- Launch Monitor Comparison
- Software Options
- Safety Considerations
- Future Upgrade Path
- Sources & Further Reading
- Related Articles
- Frequently Asked Questions
Can I Build a Golf Simulator on a Budget?
Yes. The idea that you need five figures for a home simulator is out of date. Launch monitor technology that was once limited to tour vans and pro shops now has budget alternatives at around £450. Hitting nets built for driving ranges sell second-hand for a fraction of retail. And your phone can show ball flight data that used to need a dedicated computer.
A starter setup costs roughly £700-£960, so you can come in under £1,000 with either net and a used mat. That's still a real outlay, but it's a small fraction of a premium build.
There is a trade-off. A budget simulator won't give you the immersive experience of a £15,000 build with a short-throw projector and impact screen. You hit into a net, then look at your phone to see the data. But for practice (ball speed, launch angle, spin rate and carry distance), the information is surprisingly close. It's the information that helps you improve, not the visuals.
The Seinfeld Strategy applies directly here. A simulator in your garage takes away the weather, the travel time and the range fees. The gap between "I should practise" and actually practising gets very small.
What Do I Need for a DIY Golf Simulator?
A DIY simulator has five core components. Here's the full breakdown with budget allocations.
Component List and Budget Breakdown
| Component | Recommendation | Est. Price | Budget Share | Why This Pick | |-----------|---------------|------------|--------------|---------------| | Launch Monitor | Garmin Approach R10 | ~£450 | ~47-64% | Strong value radar at around £450. Tracks 12+ ball and club metrics via Bluetooth. | | Hitting Net | Spornia SPG-7 or GoSports Elite | ~£150-£360 | ~20-40% | Ball return system, minimal bounce-back, durable netting for driver speed. | | Hitting Mat | Used commercial range mat | ~£100-£150 | ~11-20% | Thick and kind to your joints. Second-hand range mats outperform cheap foam. | | Software | E6 Connect | Free (Basic) | 0% | Included with the Garmin R10. Five free courses plus driving range mode. | | Display | Your phone, tablet, or existing TV | £0 | 0% | Cast from your phone via AirPlay or Chromecast. No extra purchase needed. | | Total | | ~£700-£960 | 100% | |
The launch monitor takes most of the budget, and that's deliberate. A good monitor with a basic net gives you far more practice value than a cheap monitor with fancy surroundings. Put data accuracy first.
Got your simulator set up? Give each session a purpose. Log your sessions in the free Green Streak app and build a daily practice habit that makes the simulator worth having.
Space Requirements
Before buying anything, measure your space twice. Nothing ends a simulator project faster than a club through the ceiling or a follow-through into a shelving unit.
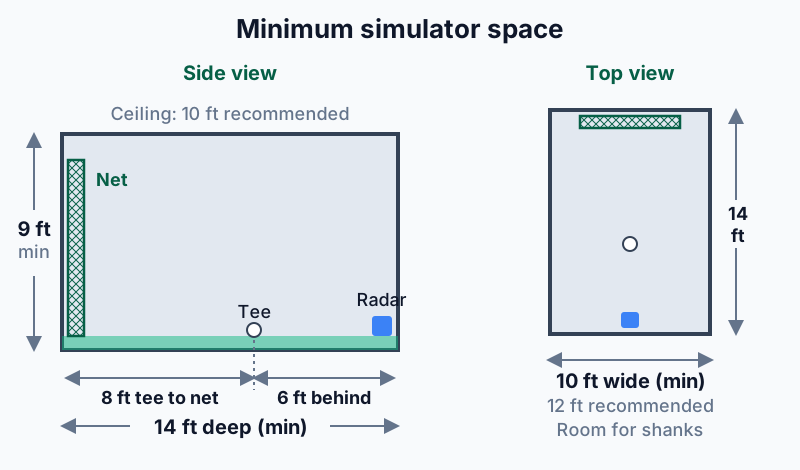
Minimum Dimensions
| Measurement | Minimum | Recommended | Why | |-------------|---------|-------------|-----| | Ceiling height | 9ft (2.7 m) | 10ft (3 m) | Full driver swing without clipping the ceiling on the backswing | | Room depth | 14ft (4.3 m) | 16ft (4.9 m) | 8ft (2.4 m) tee-to-net + 6ft (1.8 m) behind tee for radar placement | | Room width | 10ft (3 m) | 12ft (3.7 m) | Enough for a full swing plus a margin for shanks |
Many UK garages have plenty of floor space but a ceiling below 9 feet (2.7 m), so height is usually the tight dimension. With a lower ceiling you can still hit irons and wedges, but full driver swings become risky. Measure with your longest club at the top of your backswing to be sure.
The radar unit (Garmin R10) sits 6-8 feet (1.8-2.4 m) directly behind the ball. Factor that into your depth calculation, because you need room behind you as well as in front.
The Ceiling Test
Stand in your intended hitting position and take your driver to the top of your backswing in slow motion. If the clubhead touches the ceiling, you have three options: lower your tee position, accept an irons-only setup or find a taller space.
A shorter backswing is a common workaround in low garages. It isn't ideal, but it still leaves you plenty of useful iron practice.
Step-by-Step Build Guide
Step 1: Prepare the Space
Clear the hitting area completely. Move anything breakable outside a 45-degree angle from your stance, on both sides as well as towards the target. Shanks happen to everyone, including low-handicap golfers, and a thin iron shot can fly off at wild angles.
If you're working in a garage, park the car outside during sessions. Garage doors, water heaters and stored items are all at risk. Some builders hang a side curtain made from old blankets or a cheap tarpaulin to catch mis-hits.
Step 2: Position the Mat
Place your hitting mat where you want to hit from, on a flat, level surface. Concrete garage floors work fine. Avoid carpet, as the extra cushion changes the feel and can make the mat slide.
A good mat matters more than many people expect. Thin foam mats from budget retailers are hard on your wrists, elbows and shoulders over hundreds of swings. Look for used commercial range mats on eBay or sites like Rawhide Golf Ball Co. They're ugly and heavy, but they're built to absorb impact for years. A 5ft x 5ft (1.5 m) stance mat gives you room to adjust ball position for different clubs.
If you're working on your ball striking, the mat's feedback matters. You want to feel something like turf interaction rather than bouncing off a rubber platform.
Step 3: Set Up the Net
Position the net 7-8 feet (2-2.4 m) in front of the hitting mat. Make sure it covers the target area with a margin on both sides.
A good hitting net is what keeps the whole setup safe. The Spornia SPG-7 is designed to pop up in about 30 seconds and fold flat for storage, and owners report minimal bounce-back. The GoSports Elite is a budget alternative that owners say handles iron speeds well but may wear with regular driver use.
Secure the net base so it can't slide backwards under repeated impact. On a concrete floor, rubber-backed mats or sandbags on the base frame do the job.
Step 4: Install the Launch Monitor
The Garmin R10 sits on the ground, 6-8 feet directly behind the ball and aligned with your target line. It uses Doppler radar to track the ball through the first few feet of flight, then calculates the full trajectory.
Pair it with your phone or tablet via Bluetooth. The Garmin Golf app shows your data, and E6 Connect gives you simulated play on virtual courses.
Level the unit carefully, as even a slight tilt affects accuracy. Many players put it on a small tripod or a flat book to keep it stable on an uneven garage floor.
Step 5: Configure the Display
To stay under £1,000, skip the projector and impact screen, which together can cost £550-£850 or more. Put a TV, tablet or phone on a stand beside the net instead. You hit into the net, then look at the screen for the ball flight and data.
You get most of the practice value for a fraction of the cost. The numbers are the same on a 50-inch projected image or a 10-inch iPad. And for focused practice, like fixing a slice or dialling in wedge distances, the numbers matter far more than the visuals.
Building a practice habit? Use the free Green Streak app to log your simulator sessions and build a streak that makes the setup worth the money.
The 19th Hole: The golf industry would like you to believe you need a £10,000 setup to practise at home. You don't. A basic net and a phone camera are enough to start, and a launch monitor can come later. The practice habit matters more than the hardware. Start simple, prove you'll use it, then upgrade.
Launch Monitor Comparison
The launch monitor is the brain of your simulator. Here are the realistic options under £1,000.
| Launch Monitor | Price | Technology | Key Metrics | Best For | Limitation | |---------------|-------|------------|-------------|----------|------------| | Garmin Approach R10 | ~£450 | Doppler radar | Ball speed, spin, launch angle, club path, carry | Best overall value | Needs 6ft (1.8 m) behind the ball; slight spin accuracy loss indoors | | Rapsodo MLM2PRO | ~£630 | Camera + radar hybrid | Ball speed, spin, launch angle, carry, shot tracer video | Visual learners who want shot replay | Larger device, needs good lighting | | Swing Caddie SC4 | ~£600 | Doppler radar | Ball speed, launch angle, carry, spin | Golfers who want solid radar basics | Fewer club metrics than the R10 | | FlightScope Mevo | ~£480 | 3D Doppler radar | Ball speed, spin, carry, launch, smash factor | Data-focused golfers | Needs metallic stickers on balls for full spin data |
The Garmin R10 is my default pick for a budget build. Its link-up with E6 Connect and the Garmin Golf app gives you simulation and data in one package. The Rapsodo MLM2PRO is worth the extra £180 if shot tracer video matters to you. Seeing your ball flight on replay is useful for diagnosing swing faults.
If you already use a Garmin GPS watch on the course, the R10 feeds into the same Garmin Golf app.
Software Options
Your launch monitor is only as useful as the software showing the data. Here are the main options for a budget build.
Free and Included Software
E6 Connect comes free with the Garmin R10 and includes five virtual courses plus a driving range mode. Reviewers generally rate the graphics as decent and the course play as engaging, and the data overlay shows your key numbers in real time. For many golfers starting out, that's enough.
Garmin Golf App shows detailed session data, club averages and trends over time. Use it alongside the Green Streak app, which logs your practice sessions and keeps your daily streak.
Paid Software Worth Considering
GSPro (~£200/year) is the enthusiasts' favourite. It offers hundreds of real-world courses with better graphics than E6. The catch is that it needs a Windows PC, which can add £500+ to your budget if you don't already own one. Save this for Phase 2.
Awesome Golf (~£150/year) runs on iOS and Android. It supports the Garmin R10 and sits between E6's free tier and GSPro's realism.
For a budget build, start with the free E6 Connect tier. If you're using the simulator five or more days a week, upgrade to a paid platform when it feels worth the money.
Safety Considerations
A golf ball hit indoors is dangerous. Treat your simulator space with real care.
The Non-Negotiables
- Never hit without a net in place. One careless swing can send a ball through plasterboard, a window or worse
- Clear the hitting zone. No people, pets or fragile items within a 45-degree arc of your stance on either side
- Inspect your net monthly. Netting degrades over time, especially under regular driver impact. Replace it before it fails
- Use foam or limited-flight balls when testing. Before your first real session, hit a dozen foam balls to check your net catches your usual shot pattern
- Mind the ceiling on full swings. A driver clipping the ceiling at speed can shatter light fittings and send shards into the room
Garage-Specific Safety
If your setup shares space with a car, a water heater or electrical panels, add side netting or heavy blankets on exposed walls. A shank at 100 mph has enough energy to dent car panels or crack plastic fittings.
Lock the garage door during sessions if children or pets could wander in. A child walking behind you during a backswing is every parent's worst nightmare.
Future Upgrade Path
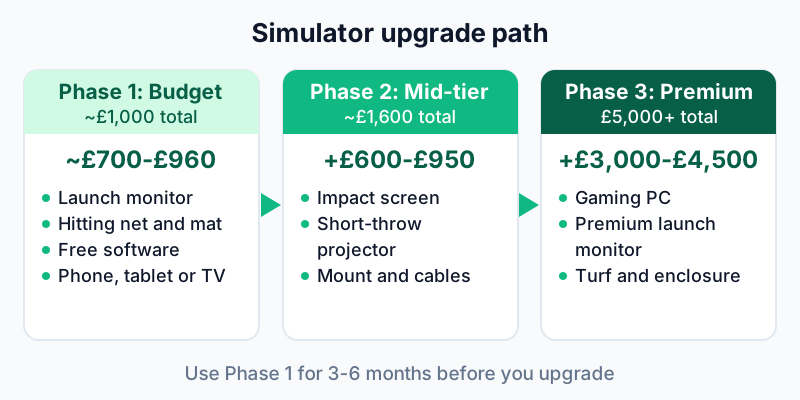
Start with the budget build and use it regularly for three to six months. If you're still hitting balls five days a week after that, upgrade with confidence. If the simulator has been gathering dust, you've saved yourself thousands.
Phase 2 Upgrades (~£600-£950 Additional)
| Upgrade | Est. Cost | What It Adds | |---------|-----------|--------------| | Impact screen (replace net) | ~£150-£250 | White surface for projected ball flight | | Short-throw projector | ~£400-£600 | Full visual simulation on the impact screen | | Projector mount and cables | ~£50-£100 | Clean installation |
Phase 3 Upgrades (~£3,000-£4,500 Additional)
| Upgrade | Est. Cost | What It Adds | |---------|-----------|--------------| | Windows gaming PC | ~£800-£1,200 | Required for GSPro and high-resolution simulation | | Premium launch monitor (Bushnell Launch Pro, Mevo+) | ~£1,900-£2,800 | Tour-level accuracy, spin data, club fitting capability | | Turf and enclosure build-out | ~£300-£500 | Permanent installation with side walls and flooring |
It's tempting to skip straight to Phase 3, but I'd resist it. A familiar story on r/golf is the golfer who spends £5,000 on a simulator build that becomes an expensive clothes rack by March. The daily practice habit matters more than the hardware tier, so prove the habit first.
If your goal is to break 100, a Phase 1 setup you use most days is worth more than a Phase 3 build you use twice a month.
Sources & Further Reading
- Garmin Approach R10 Official Specs: full specifications and supported metrics for the R10 launch monitor
- MyGolfSpy Launch Monitor Testing: independent, data-driven reviews and accuracy comparisons of consumer launch monitors
- Golf Monthly: Home Simulator Guide: setup advice and product recommendations from experienced reviewers
- r/golf Simulator Community: real-world build reports, troubleshooting and budget breakdowns from DIY builders
Related Articles
- The Seinfeld Strategy: Why "Don't Break the Chain" Works for Golf
- Best Golf Nets for Garage Practice
- How to Stop Topping the Golf Ball
- Fix Your Slice in 5 Minutes
- Best Golf GPS Watches
- Best Golf Simulators on a Budget: Complete Buyer's Guide
Frequently Asked Questions
How much does it cost to build a basic DIY golf simulator?
A working setup costs roughly £700-£960. That covers a radar launch monitor (~£450), a hitting net (~£150-£360), a used commercial mat (~£100-£150) and free simulation software on your existing phone or tablet. Adding a projector and impact screen takes the total to roughly £1,300-£1,900.
What is the best launch monitor for a budget simulator?
The Garmin Approach R10 is a popular choice at around £450. It tracks ball speed, spin, launch angle, carry distance and club path. It pairs with E6 Connect for virtual course play and works indoors or outdoors.
How much space do I need for a golf simulator?
You need a ceiling of at least 9 feet (2.7 m), 14 feet (4.3 m) of depth and 10 feet (3 m) of width. A standard double garage usually has enough depth and width, but the ceiling can be tight for full driver swings. Measure with your driver at the top of your backswing.
Can I use a golf simulator in a single garage?
A single garage is often too narrow for a comfortable setup, so measure the width before you buy anything. You need at least 10 feet (3 m) of width for a full swing with a safety margin. If your single garage is wider than that, it can work for irons and wedges, but driver swings may feel cramped.
Do I need a projector for a home golf simulator?
No. A projector and impact screen add immersion but aren't needed for useful practice. Put a TV, tablet or phone beside the net to see your shot data and ball flight. The data is the same whatever the screen size. Save the projector for a future upgrade once you know you'll use the setup regularly.
Is the Garmin R10 accurate enough indoors?
Owners and independent reviewers report that the R10 performs well indoors for ball speed, launch angle and carry distance. Spin accuracy can drop slightly indoors compared with outdoor use. For practice and for tracking change over time, owners generally find the data reliable and consistent.
What is the best hitting mat for a home simulator?
Avoid thin foam mats from budget retailers, which can leave your joints sore over hundreds of swings. Used commercial range mats from sites like Rawhide Golf Ball Co or eBay give you a thick, impact-absorbing surface at a fraction of the new price. A 5ft x 5ft stance mat gives you room for different ball positions.
Can I build a simulator if my ceiling is under 9 feet?
Yes, with limitations. A ceiling under 9 feet (2.7 m) rules out full driver swings for many golfers but works for irons, wedges and chipping practice. Plenty of golfers get good sessions in a lower space by focusing on short game and iron accuracy. A 5-minute warm-up routine with wedges works well in a compact setup too.
Disclaimer: This article is for informational purposes only and does not replace professional golf instruction. Individual results will vary based on ability, practice consistency, and physical condition. Consult a PGA professional for personalised swing advice.
Ready to build your practice streak?
Track your sessions, set goals, and improve with Green Streak — completely free.
Get Started Free